Share this
Flexo Printing Defects: 3 Main Causes for Bridging & Filling In
by Luminite on Jul 3, 2023 9:45:00 AM
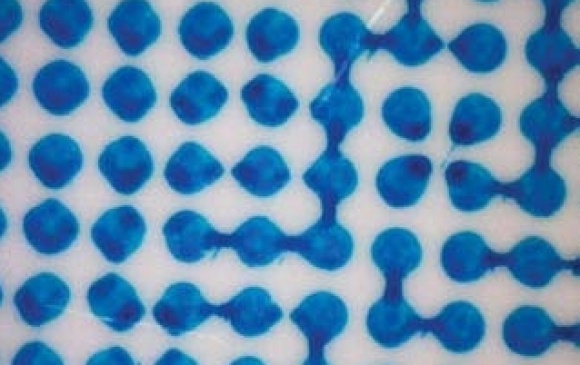
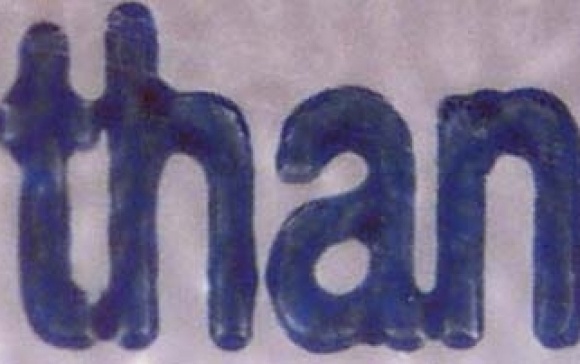
Let’s say you’re printing fine text or an intricate graphic with a high resolution. Your substrate comes off the press, and you notice letters or the areas within the graphics that bleed together for a very low-quality, low-resolution product.
You’re likely encountering one of two common and similar flexographic printing defects: filling in or bridging. These issues (and others listed in our defects guide below) could arise from a range of errors from pre-press to complex mechanics.
With your print thrown in the trash, you begin troubleshooting. Let’s hope it doesn’t take too long or require too many test runs, because we all know time is money.
Looking for more printing resources?
In most cases, you’re looking at one of the following issues allowing too much ink on the substrate:
- Excessive pressure
- Anilox volume/cell count/engraving angle
- Ink viscosity
Let’s examine these further.
Bridging and Filling In | Symptoms and Causes
Before going into depth about the causes -- first, let's go over some specific symptoms you might be seeing.
Bridging - Separate dots in the print screen connect with each other irregularly.
Filling in - Excess ink accumulations fill in spaces that weren’t intended to be printed, especially on prints with small type or halftone screened areas.
- Pressure & Press Mechanics
- Anilox Volume / Cell Count / Engraving Angle
- Ink Viscosity
1. Pressure & Press Mechanics
These flexographic printing defects are particularly nightmarish for print jobs requiring fine precision. Press mechanics can either help your print job run seamlessly or turn your reproduced image into something unrecognizable.
Pressure could be a root cause of most flexo printing defects you could encounter. Simply enough, too much pressure from your image carrier onto your substrate will push and press ink into places it doesn’t belong.
Conversely, with too little pressure you could experience other indicators of poor ink transfer, such as skip out. A great guideline in this instance is if the image skips out in the same spot repeatedly, you’ll likely need more anilox, but if it’s skipping randomly, you’ll need more pressure on the substrate.
2. Anilox Volume/Cell Count/Engraving Angle
An anilox is a cylinder that transfers ink onto the image carrier. The amount of ink delivered is controlled by a pattern of small, precisely sized dimples called cells in the anilox surface.
Too much ink on the anilox equals too much on the substrate, which could potentially cause both bridging and filling in. The pattern of cells is defined by 3 variables:
- Cell volume
- Cell count
- Engraving angle
The cell volume of an anilox is the total space available to hold ink in 1 inch sq. on its surface. Generally, greater volumes are used for brighter, bolder work, and smaller volumes for jobs requiring fine detail.
The cell count refers to the number of cells per inch the anilox has when measured along the engraving angle, which is the arrangement of cells in relation to the axis of the roll.
Higher cell counts (which correspond to lower volumes) are typically more appropriate for finer detail work, while lower cell counts (with higher volumes) are better for bold and higher-density work. You’ll generally want a lower cell volume and a higher cell count to optimize the amount of ink transferred for a full and vibrant image.
3. Ink Viscosity
Viscosity, or the thickness of your ink, is a key indicator of how well the ink will release from both the anilox roll and your flexo plate or sleeve. When ink becomes too thick, or viscous, it builds up on the sleeve and causes both bridging and fill-in.
Are you positive the ink that your using is optimized for your print application? Double-check using our Ink Optimization Guide.
Flexo Printing Defects: Honing in on Bridging and Filling In Resolution
You can’t afford to waste loads of time and substrate trying to figure out what’s causing your image to bleed together. Bridging and filling in are two very similar flexographic printing defects. They’re also very preventable if you make the correct pre-press decisions regarding pressure, anilox, and ink viscosity.
Of course, flexo is sometimes an inexact science, and there could be multiple issues causing your reproduced images to come out incorrectly. Download our flexo printing defect guide below for further insights. If you have more questions, contact us here or request a free consultation.
(Editor's Note: This blog post was originally published on Feb. 6, 2018, and was updated in July 2023 to reflect updated information, resources, and insight.)
Share this
- Flexographic Printing (81)
- Image Carrier (28)
- Elastomer sleeves (27)
- Ink Transfer (25)
- Quality (22)
- Flexo sleeve (20)
- News (18)
- printing defects (18)
- flexo printing defects (17)
- sustainability (13)
- Flexo Troubleshooting (12)
- Ink (12)
- Digital Printing (10)
- Flexo 101 (10)
- Flexo Inks, (9)
- Anilox (7)
- Blister Packaging (7)
- Cost (6)
- print misregistration (6)
- regulations (6)
- Corrugated Printing (4)
- pinholing (4)
- "Tradeshow (3)
- Digital Flexo (3)
- Gravure Printing (3)
- Insider (3)
- Load-N-Lok (3)
- Wide Web (3)
- direct laser engraving (3)
- flexo-equipment-accessories (3)
- gear marks (3)
- halo (3)
- testing (3)
- Narrow Web (2)
- bridging (2)
- feathering (2)
- filling in (2)
- mottled image (2)
- pressure (2)
- Labelexpo (1)
- dirty prints (1)
- doughnuts (1)
- embossing (1)
- kiss impression (1)
- October 2023 (2)
- September 2023 (1)
- August 2023 (1)
- July 2023 (3)
- June 2023 (1)
- May 2023 (5)
- April 2023 (1)
- March 2023 (2)
- February 2023 (1)
- January 2023 (3)
- December 2022 (1)
- October 2022 (3)
- September 2022 (2)
- August 2022 (2)
- July 2022 (3)
- May 2022 (1)
- April 2022 (4)
- March 2022 (2)
- February 2022 (5)
- January 2022 (7)
- December 2021 (1)
- November 2021 (3)
- October 2021 (2)
- September 2021 (1)
- August 2021 (1)
- July 2021 (3)
- June 2021 (1)
- May 2021 (4)
- April 2021 (4)
- March 2021 (4)
- February 2021 (2)
- December 2020 (1)
- November 2020 (1)
- October 2020 (2)
- September 2020 (1)
- August 2020 (3)
- July 2020 (2)
- June 2020 (3)
- May 2020 (1)
- April 2020 (1)
- November 2019 (3)
- October 2019 (1)
- August 2019 (1)
- July 2019 (1)
- April 2019 (1)
- March 2019 (1)
- January 2019 (1)
- October 2018 (2)
- August 2018 (1)
- July 2018 (1)
- June 2018 (1)
- February 2018 (2)
- October 2017 (1)
- September 2017 (2)
- January 2016 (1)
- February 2015 (1)
- January 2015 (1)
- December 2014 (2)
- September 2014 (1)
- February 2014 (1)
- January 2014 (1)
- December 2013 (3)
- October 2013 (1)
- September 2013 (1)
- June 2013 (1)
- January 2013 (1)


Comments (4)