
Share this
by Luminite on May 4, 2023 9:15:11 AM
Ready to conquer your flexo printing defects and boost productivity? Say goodbye to costly downtime and hello to a smoother printing process with our comprehensive flexo printing defects diagnostics chart and this troubleshooting guide.
Armed with this knowledge, you’ll be able to swiftly identify the culprit behind your flexo printing woes and zero in on the most probable causes. No more guesswork, no more wasted time – just speedy solutions to get your machines back in business.
Click here to download the grid and accompanying guide. For more detailed instructions on how to use the chart and interpret results, download the full Printing Defects Troubleshooting Guide below.
1024_1.jpg?width=580&height=751&name=Trouble_shooting_Chart_English_(1)1024_1.jpg)
How to Read the Flexographic Printing Defects Diagnostic Chart
This chart was created to help pinpoint the specific defects you’re encountering, and then seamlessly navigate to the most probable causes behind them. On the horizontal axis, you’ll find the causes of flexo print defects, while on the vertical axis, you’ll find common defects in flexographic printing.
We further outline both axes below:
HORIZONTAL AXIS: CAUSES OF FLEXO PRINT DEFECTS
In our experience, ten of the most common causes of flexo print defects include:
- Pressure
- Press mechanics
- Anilox
- Cell volume
- Ink transfer
- Ink viscosity
- Ink pH level
- Contamination
- Plate swelling
- Drying speed
VERTICAL AXIS: TYPES OF FLEXO PRINTING DEFECTS
We generally recognize 12 common defects in flexographic printing. As you can see from the checklist, they include:
- Excessive Dot gain
- Gear marks
- Halo
- Feathering
- Doughnuts
- Skip out
- Misregistration
- Mottled image
- Filling in
- Bridging
- Pinholing
- Dirty print
Continue reading for detailed explanations of each defect type.
(To jump to a defect type, click the corresponding link in the above list.)
Flexo Printing Defect Types: Breaking Down the Causes
As you navigate the world of flexo printing, understanding the root causes of various defects is crucial for efficient troubleshooting and optimal print quality.
In this section, we dissect the complex interplay of factors that commonly lead to flexo printing defects, helping you unravel the mystery behind each issue. From excessive dot gain to bridging, we explore the multitude of elements that can impact your printing process and provide you with the knowledge needed to address them effectively.
EXCESSIVE DOT GAIN
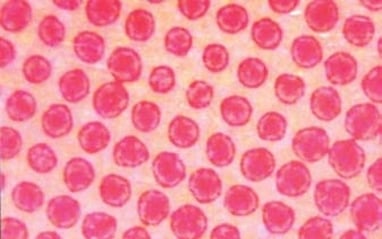
Dot gain occurs in every print – that’s the essence of flexographic printing. You end up with a problem when it becomes too much.
Appearance: Images appear darker and sometimes less high-resolution than intended.
Most likely causes: You may have too much pressure between the printing sleeve/cylinder/plate and the substrate. Try a “kiss” impression – if pressure is the issue, your dots should return to normal.
Another likely cause is thick or swollen sleeves or flexible printing plates from aggressive inks, solvents, and/or cleaning agents. You can avoid swelling by choosing in-the-round (ITR) elastomer sleeves, which are extremely durable and resistant to swelling.
Here are some other potential causes:
- Incorrect ink viscosity
- Too much anilox cell volume
- Dots dipping into the anilox (cell count too low)
- Press damage or wear
- Dirty image carrier
- Mounting tape has the wrong thickness or trapped air, if using plates
More on how to troubleshoot and fix dot gain here.
GEAR MARKS
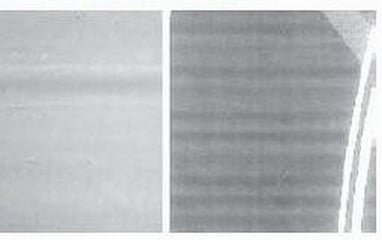
This is often also called gear chatter or banding. Routine press monitoring and maintenance are needed to avoid this defect. Machinery wears and breaks down, and it’s critical to keep it up.
Appearance: Alternating lines of light and dark that typically run perpendicular to the web’s direction on the press.
Most likely causes: Gear marks stem from press mechanics and too much pressure. Within those 2 key indicators, however, are many other potential issues that could hurt your printing quality. The good news is gear marks (or chatter) are sometimes clearly audible on your press.
Gears wear over time, with teeth eroding away and even breaking. Improperly sized gears won’t mesh correctly and will cause imbalance and bouncing.
Other potential causes:
- Poor drive gear lubrication
- Pressure tolerances between elastomer and photopolymer sleeves/plates
- Inadequate cleaning
More on how to troubleshoot and fix gear marks here.
HALO
Flexographic printing is a pressure-sensitive process. Fittingly, the halo effect is one of 9 common flexo printing defects we recognize with pressure as a likely cause.
Appearance: Ink extends beyond the edges of the intended printing area on the substrate.
Most likely causes: Too much pressure pushes ink out because it has nowhere to go. Irregular pressure could be apparent if the severity of the halo differs from one location to another on the substrate. Lower and otherwise adjust the pressure from the print cylinder to the substrate as a possible solution.
Other potential causes:
- Too much ink transfer
- Cylinder-to-web speed mismatch
More on how to troubleshoot and fix halo here.
FEATHERING

While too much pressure also predominantly causes this flexo defect, there could be a host of other sub-issues making your prints look unprofessional.
Appearance: Ink extends beyond the intended printing area to create uneven edges, which look quite like the hairlike projections of a bird’s feather.
Most likely causes: Ink builds up around dots and inadvertently increases the printing surface area. You could be experiencing too much pressure between the print cylinder and the substrate or between the anilox roll and print cylinder earlier in the process.
Other potential causes:
- Dried ink on the image carrier
- Debris on the substrate
- Ink drying too quickly
- Ink surface tension too high
DOUGHNUTS
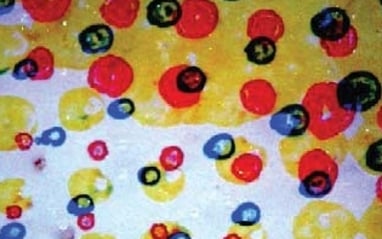
This flexo printing defect is no delicious confectionery treat. It’s an aggravating and potentially expensive problem to experience.
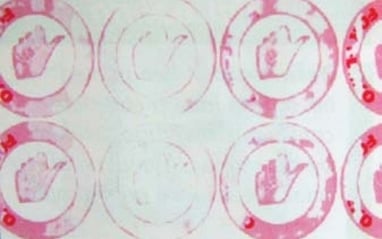
Appearance: Screen dots come out slurred and distorted with blank or semi-blank spaces in the middle. They look like lopsided doughnuts.
Most likely causes: While pressure is another potential root cause of doughnuts, the most likely culprit is a cylinder or plate swelling. Aggressive inks and solvents can wreak havoc with printing products, causing them to swell and distort to, in turn, make images nearly unrecognizable.
Switching to more solvent-resistant, direct-laser engraved (DLE) ITR elastomer sleeves is a potential solution.
Other potential causes:
- Pressure
- Print-to-web speed conformity
- Ink transfer
More on how to troubleshoot and fix doughnuts here.
SKIP OUT
Your ink must wet out completely on the substrate (in essence, excellent ink transfer) Press mechanics play a vital role in that equation. If you have wobbling, parts of the printing form will contact the substrate unevenly. But you may also be experiencing other issues from ink composition to thorough maintenance and cleaning.
Appearance: Prints come out with sections that are either too light or missing entirely.
Most likely causes: The smallest resonant vibrations and other issues with press mechanics can impact how well the print cylinder contacts the substrate. Any unintended movement of press components can easily cause skip out.
Other potential causes:
- High or low areas on the image carrier, bent shafts, or out-of-round components
- Ink surface tension and substrate surface energy
- Pressure
- Ink viscosity and pH
- Routine maintenance and cleaning
More on how to troubleshoot and fix skip out here.
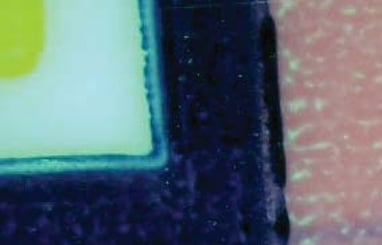
MISREGISTRATION
Great flexographic quality requires precise alignment of ink combinations on the substrate. Even if it’s off by a small fraction of an inch, your design accuracy and color patterns will be incorrect.
Appearance: Certain colors or design elements don’t align, causing color shifting, cracks between colors, or blurred-over prints.
Most likely causes: Incorrect plate position or orientation. Each plate or separation must be aligned exactly for an excellent print.
Other potential causes:
- Impression cylinder concentricity
- Cylinder/plate/sleeve condition
- Gear condition
- Idle rollers dragging or rotating irregularly
- Malfunctioning web guide
- Web growth or fanning out
- Wandering web
- Substrate tension
- Incorrect tolerances
More on how to troubleshoot and fix misregistration here.
MOTTLED IMAGE
This flexographic defect plagues food packaging and other package printing that requires a lot of solid color imagery. In these cases, ink is not wetting out fully on the substrate.
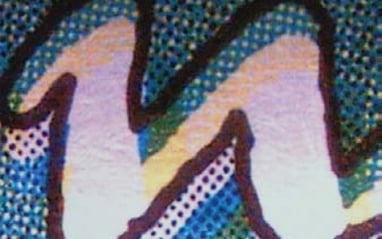
Appearance: Printed areas intended to have solid color have noticeable unevenness in print density and shade/hue variations. This appears bumpy and has the visual consistency of an orange peel.
Most likely causes: Poor ink transfer between the anilox, image carrier, and substrate are causing variations in print density. This often begins with selecting an anilox with the proper cell count/cell volume and making sure all ink-transferring elements on your press are clean.
Other potential causes:
- Surface tension
- Ink viscosity
- Pressure
- Damaged or contaminated image carrier, ink, or substrate
More on how to troubleshoot and fix mottled image here.
BRIDGING/FILLING-IN
Although these are technically separate, these 2 similar flexo printing defects can be considered as one. Basically, a variety of factors could be allowing too much ink on the image carrier.

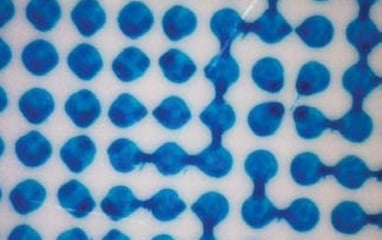
Appearance: Letters or intricate areas within graphics bleed together for a low-quality, low-resolution image. In bridging, closely spaced design elements connect with each other irregularly. In filling in, excess ink accumulation fills spaces that weren’t supposed to be printed.
Most likely causes: Pressure and press mechanics could easily push ink where it doesn’t belong. Lighten the load on the substrate with a “kiss” impression.
Other potential causes:
- Anilox cell volume/cell count and/or engraving angle
- Ink viscosity
More on how to troubleshoot and fix bridging/filling in here.
PINHOLING

Some areas of your substrate don’t print fully. This one has a very distinctive, incomplete look.
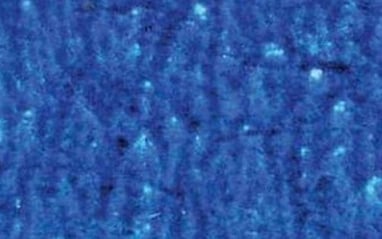
Appearance: Tiny unprinted spots about the size of a pinhole.
Most likely causes: Among the potential culprits, you may have a dirty anilox causing poor ink transfer. Ink may be drying too quickly, causing it to pick off the substrate. Be sure to properly clean your anilox for clean print runs.
Other potential causes:
- High ink viscosity
- Anilox has lost cell volume
- Irregular or damaged substrate surface
- Incorrect surface tension chain, most likely between the image carrier and substrate
More on how to troubleshoot and fix pinholing here.
DIRTY PRINT

With many potential causes, this defect greatly impacts image quality in high-resolution areas.
Appearance: Speckles in the ink that give it a dirty appearance or evidence of excessive dot gain.
Most likely causes: The defect’s namesake: Dirt. Airborne contaminants surround us everywhere, particularly in an active industrial flexo printing press room. Working machinery promotes static electricity, which attracts floating dust, paper particles, and other contaminants to your ink, anilox, image carrier, and/or substrate.
Other potential causes:
- Drying ink
- Incorrect ink viscosity
- Improper anilox
- Non-uniform substrate
More on how to troubleshoot and fix dirty print here.
Get the Full Flexo Printing Defects Troubleshooting Kit to Identify & Fix Your Printing Issues
The full guide contains details about each defect, explanations of the causes, and instructions on how to fix each one. Depending on the severity of your issues, troubleshooting may involve:
- Press maintenance/replacement parts
- Computer recalibration
- Switching to In-The-Round (ITR) flexo sleeves
- Choosing between elastomer vs. photopolymer sleeves/plates
- Implementing proper sleeve/plate maintenance routines
- Ink or substrate adjustments
For more information contact Luminite Product Corporation today.
Click the button below or scroll down and fill out the form to download your guide today:

Editor's Note: This blog post was originally published on December 2017 and has been updated to reflect updated information and resources.
Comments (76)