
Share this
by Luminite on May 19, 2021 9:00:00 AM
We’re sorry you’re feeling the pressure in your printing operations.
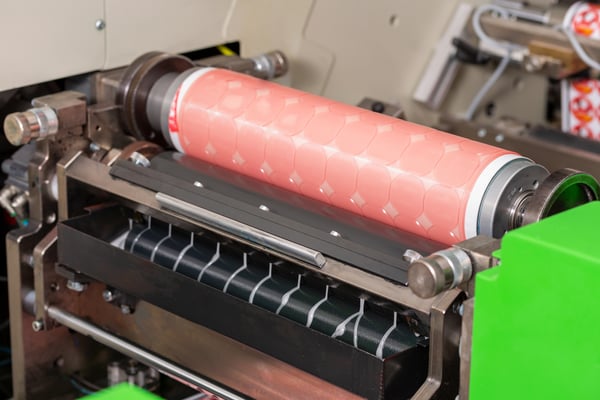
Flexo printing is a pressure-sensitive process. You may have great ink chemistry/composition combined with the best choices of anilox, image carrier, and substrate. But unfortunately, your prints won’t come out correctly without achieving just enough pressure to transfer the ink evenly and completely.
The solution? A kiss impression.
You’re concerned with 2 impression settings controlling anilox-to-image carrier and image carrier-to-substrate. Finding the appropriate pressure balance can be difficult. Too much pressure can cause flexo printing defects like excessive dot gain and halo, while too little pressure can cause errors like skip out.
A kiss impression achieves that happy pressure medium. Here are the steps:
Kiss Impression Steps
| 1. | Mount the sleeve/cylinder and anilox. |
| 2. | Lower the image carrier ensuring enough space between the anilox and impression cylinders (to avoid image carrier damage). |
| 3. | Press the image carrier into a soft (kiss) impression with the substrate. |
| 4. | Press the anilox cylinder into a soft (kiss) impression with the image carrier (don’t touch the image carrier to the anilox yet if the anilox is turning). |
| 5. | Back off the impression for both the image carrier and anilox cylinders to be close to a kiss impression before you set the impression fully. |
| 6. | Turn on the press to begin rotating the anilox and print cylinders. |
| 7. | Set the anilox-to-image carrier impression and adjust it to achieve full ink transfer across the image carrier without too much pressure (the ideal kiss impression). |
| 8. | Set the image carrier-to-substrate impression and adjust it to achieve full ink wetout on the substrate without too much pressure (another ideal kiss impression). |
| 9. | Reset the anilox-to-image carrier impression. |
| 10. | Adjust the anilox impression by lifting (backing off) until the image starts to fade, and then slowly initiate just enough pressure to correct the fade for image completion and uniformity. |
| 11. | Lock it down and adjust the next impression cylinder. |
Many flexographic experts recommend beginning with the last color placed and working back to the first on the press. This way, printers can immediately see their adjustments, analyze them, and make additional adjustments, if necessary.
Troubleshooting Pressure with Slur and Impression Targets
Now, let’s talk about “squash bugs” - and, no, they have nothing to do with insects. These little hexagonal marks on the margins of your sleeves or plates are great indicators if you’re achieving ideal pressure and press speed.
Types of Impression Targets
Flexo printers often use a hexagonal target or a star-shaped target. The hexagonal “squash bug” has a series of concentric hexagons arranged internally from largest to smallest. They look like this:
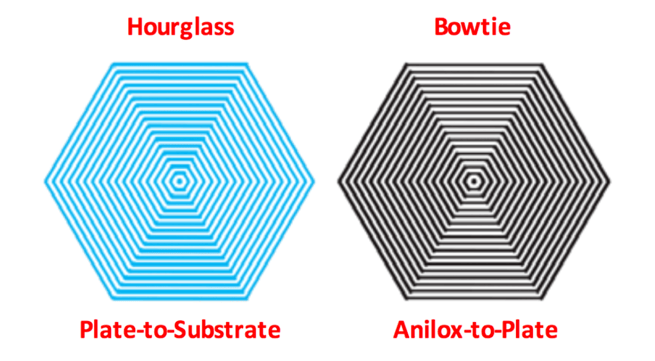
Source: All Printing Resources, Inc.
An hourglass pattern within the hexagon indicates there’s too much pressure between the image carrier and substrate. A bow-tie pattern indicates too much pressure between the anilox and image carrier.
These targets can also reveal the calling cards of slurring (blurred) images caused by the print cylinder traveling more quickly or slowly than the anilox roll or substrate. The hexagonal target further identifies ink balance and drying speeds that can lead to many flexo printing defects. “Squash bugs” can also help you troubleshoot issues with the 4-color printing process.
Don't forget about flexo surface tension
Another way to prevent potential flexo printing defects is to ensure the flexographic inking system has appropriate surface tensions and energies. More specifically the ink needs to have a low enough surface tension compared to the image carrier so it will adhere to it. The substrate must then have a higher surface energy to fully pull the ink off the image carrier.
In general as the ink moves through the inking system, the surface tension/energy of each successive component must increase.
Ensuring that your surface energy and tension of your printing system is optimized is one of the best ways to continually stay ahead of defects. Read more about this consideration in our past blog here.
Kiss Print Solutions: The Ideal Amount of Flexo Printing Pressure
Pressure is at the heart of most flexographic printing errors. In fact, it’s a primary or secondary cause for 9 of the 12 flexo defects we troubleshoot and solve most often. In addition to dot gain, halo, and skip out (mentioned above), these pressure-related problems can also include:
- Feathering
- Doughnuts
- Misregistration
- Bridging
- Filling in
- Gear marks
Your prints may be experiencing too much or too little ink transfer as a direct result of pressure. Keep in mind this rule of thumb: An image skipping in the exact same spot each repeat requires more anilox (this could also indicate damage to the image carrier); while random skipping needs more print cylinder impression.
To find out more about other flexo printing defects, check out our comprehensive guide!

Editor's Note: This blog post was originally published May 3, 2018 and was updated November 20, 2020 to reflect changes in insight and resources. This blog was updated again on May 19, 2021.
Comments (2)